顯示具有 MAYA 標籤的文章。 顯示所有文章

2012年1月11日 星期三

Moving Pivot Point

Sometimes you want to rotate an object around a specific point or scale based on a different point.

1.Select an object in your sence view and choose theMove Tool (w key).

2. Hold the "d "key and drag the object's origin to a new location. You can also press theHome key (PC-Insert key), move the point, then press the Home (PC-Insert) key to cancel.

3.To test your new pivot point

4. You  can also enter your value press Enter + Esc in the object's Channel Box..

Center Pivot Menu Item
You can also reset the pivot point to the object center by choosing Modify > Center Pivot.

2012年1月3日 星期二

Adding Attributes&Connection editor

1.Select L_handCtrl

2.Click on Edit tab in Channel box,then choose Add Attributes


3.type "L_fingerBend_1"in the box of  Long name,Click OK

4.You will find the"L_fingerBend_1"appear in Channel box


5.Select L_fingerBend_1 in Channel box,then click edit choose Connection editor,The Connection editor window appear


6.Select  L_fingerBend_1 in Outputs windows ,then select L_joint of the finger101in the view,Press Reload Right on the top,then choose rotate Z in Inputs windows


Rotate Z of the L_finger101 appear yellow colour


7.Now,Select L_handCtrl,you can set number to L_fingerBend_1,rotate the finger in the channel box

Press Shift key and click middle button on the mouse to change the number,test it.

8.Select L_HandCtrl again

9.Click on Edit tab in Channel box,then choose Add Attributes


10.Type "L_fingerCtrl_01"in the box of  Long name,Click OK

11.Select the word "L_ fingerCtrl_01" that appears in the channel box so it become higlighted ,then click edit tab and choose Set Driven Key,  The Set Driven Key  window appear.


12.click on Load,then choose selected as driver

13.Select  L_ fingerCtrl_1  in the driver windows,

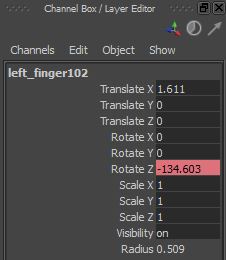
14.Select  Joint of the L_ finger102 in scene view,then click load choose selected Drivern as shown in the following figure.


15.Select Rotate Z in Driven window


Press Key Button in the Set Key Window,
 There is red colour at the Rotate Z of L_ finger102 in the Channel box


16.Don't close Set Driven Key window,then Set 1 to L_ fingerCtrl_01 in channel box.


17.Rotate finger in scene view,then click Rotate Z in the Drivern List.


Press Key in the Set Key Window, There is red colour at the Rotate Z of L_ finger102 in the Channel box


18. test the contorl,finish


Create Aim Control of the Eye

1.Create>locator

2.Rename the locator  to "L_eyeCtrl

3.Move the Locator that you desire


4.Edit>Delete all by type>Non deformer History

5.Modify>Freeze Transformation

6.Select L_eyeCtrl,and press shift select L_eyeJoint

7.Constrain>Aim

8.Test the Control


2011年12月28日 星期三

Create Control of the Pole Vector

1.Create Nurbs Primitves>circle,set Radius to1.5 in the inputs of the Channels Box.

2.Rename the circle to "L_leg_poleCtrl"

3.Hold "v"key and Move the Contrl  to joints of  the L_hip


and then move a little from body,keep alignment


4.Choose Edit>Delete All By Type>Non-Deformer History

5.Modify>Freeze Transformation

6.Select L_leg_poleCtrl then select L leg ikhandle


7.Chosse Constrain>Pole Vector(Note that  L leg ikhandle is no keyframe in timeline)

8.Finish

2011年12月21日 星期三

Fix the skin weights Using the Component Editor

1.Test the movement of your character by selecting controllers and translating or rotating them around.
2.Determine if joints are affecting the wrong area of geometry

Note:The main areas for shared weights are usually in the legs and feet,the head and shoulder, or the finger.Basically,anywhere when you have parallel areas of geometry and joints.

in this example,the head geomertyis being affected by both the shoulder,arm.wrist joints.so there is a pulling of the geometry.


3.Select the vertices that are being affected incorrectly.


4.Choose Windows>General Editors>Component Editor and click on the Smooth Skin tab


5.in the top list,findthe joints that affecting these points and should not be.Click on the box,then" 0".
in this example,select the row of the head ,then type "1",other row,type"0"

6.repeat this for other affectted areas ,Finish.


Modify skin weights


1.select model
2.select Skin>Edit Smooth Skin>Paint Skin Weights Tool Setting


3.Select right_arm_root in the influences list.

4.Set the Mode to Paint,then set Paint Operation to Add.


5. hold "shift"or"Ctrl"key and paint area that are being affected incorrectly


6.repeat this for other joints

Creating Animation Controls

Animation controls allow easy to the charater for posing and animating

1.Create>nurbs primitives>circle,rename LFootCtrl


2.move the circle to the ankle joint,you can use snap to point


3.Freeze transformations


4.Select R_footCtrl  ,and then select ikhandle,choose Constrain>point


5.test the LFootCtrl

6.Select R_footCtrl   ,and then select Ankle joints,choose Constrain>orient setting


7.now,can rortate the ankle


rigging_hypergraph